SK-AM62B-P1 Evaluation Board🔗

Introduction🔗
The PAN W602 requires a fairly powerful host processor that executes the low-level Wi-Fi® drivers as well as some high-level Wi-Fi application software.
As an evaluation platform you can use the Texas Instruments AM62x starter kit evaluation module (SK-AM62B-P1), which is based on the AM62x application processor with 4 Arm® Cortex®-A53 cores and 2 Cortex®-R5F cores. It features a 8 GB LPDDR4 RAM, a micro SD card slot, two Ethernet ports and a USB 2.0 port. The M.2 key E interface provides support for Wi-Fi® and Bluetooth®.
Host System Setup🔗
Hardware Modification🔗
Before proceeding with the software setup, verify that your AM62x starter kit evaluation module is properly configured for use with the PAN W602. Depending on the board revision, a small hardware modification may be required to ensure correct operation. In the following steps, you will check the presence of resistor R6 and, if necessary, populate it with a 10 kΩ resistor. This modification is mandatory and should be completed before connecting or powering the PAN W602 to avoid potential hardware issues.
Complete the following hardware modification on your AM62x starter kit evaluation module.
-
Look for the R6 resistor on the back of your board.
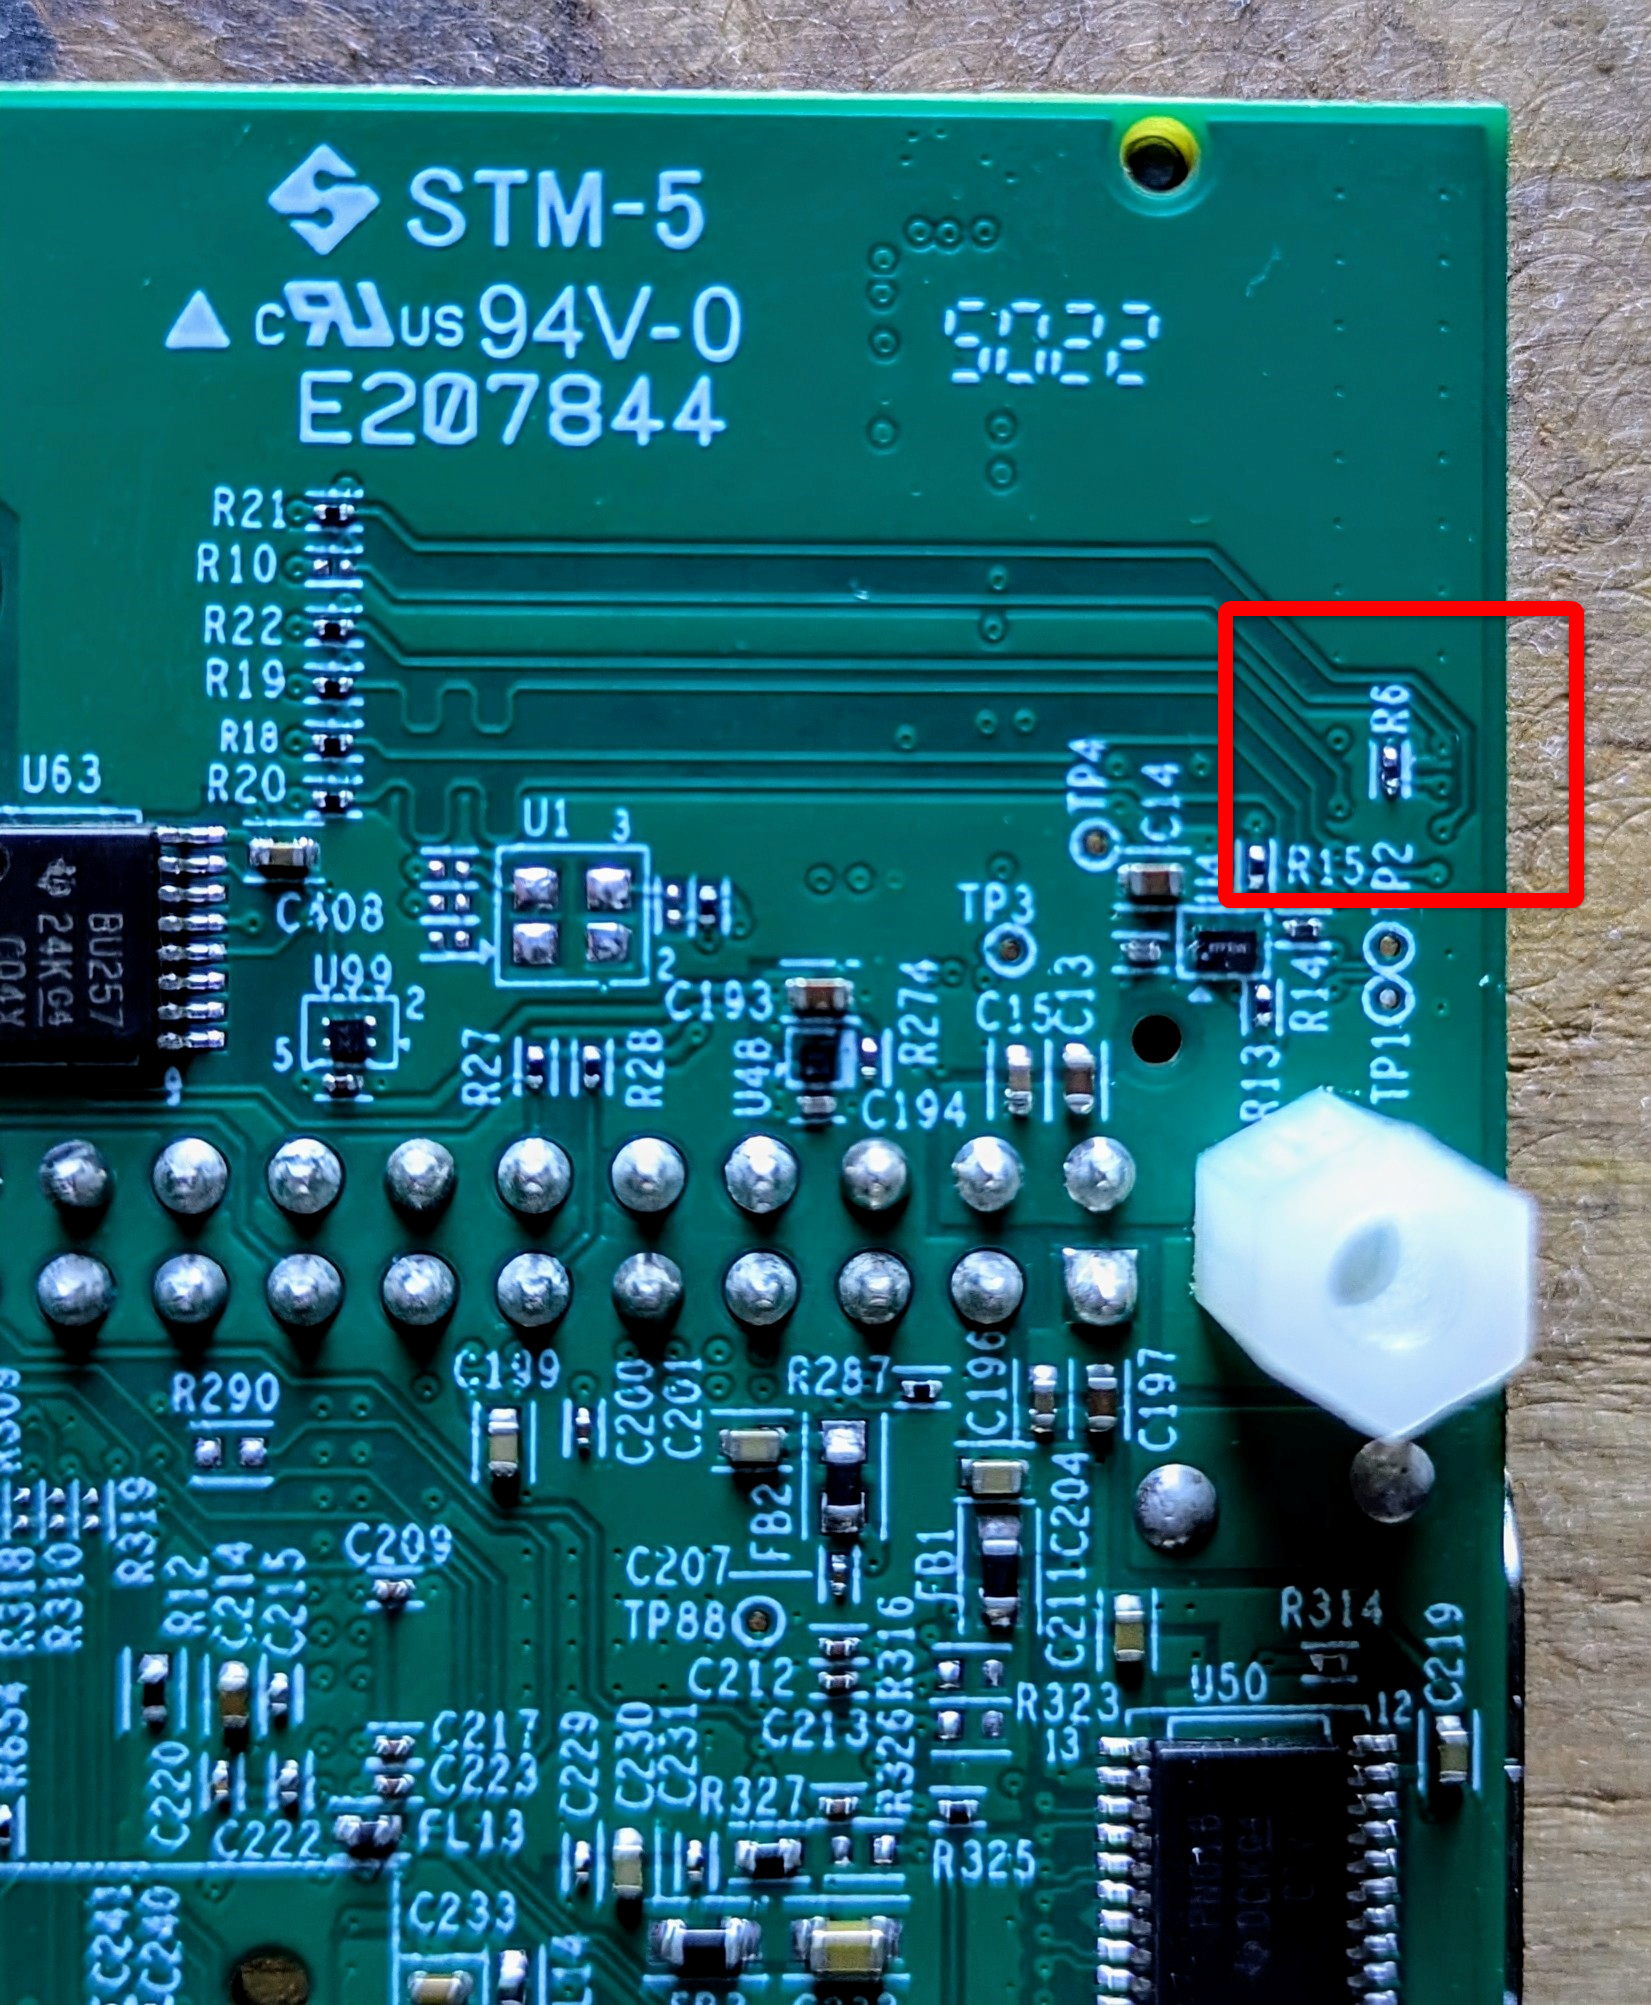
-
If the R6 resistor is already populated, you don't have to do anything.
If it is not, you must solder a 10 kΩ resistor to location R6.
Danger of Hardware Damage
Do not continue until a 10 kΩ resistor is present at location R6.
Software Integration🔗
The following sections describe how to integrate and enable the Panasonic PAN W602 wireless module on the Texas Instruments AM62x Starter Kit (SK-AM62B-P1) running the Texas Instruments Linux Processor SDK. The procedure covers the complete software bring-up workflow, including preparation of a bootable SD card, installation of the required Texas Instruments SDK and CC33XX Software Package, integration of Panasonic regulatory and configuration files, kernel patching and rebuilding, deployment of firmware and drivers, and final system verification.
The primary goal is to create a Linux system image that fully supports the PAN W602 module and complies with regulatory requirements. By following this guide, the user will obtain a customized AM62x Linux environment with the required kernel modifications, wireless firmware, certificates, and device tree configuration needed for Wi-Fi operation.
The scope of this document includes:
- Preparing and flashing a bootable Texas Instruments AM62x Linux image to a microSD card.
- Installing the Texas Instruments AM62 Processor SDK and CC33XX Software Package.
- Obtaining and integrating Panasonic-specific regulatory and configuration files.
- Applying PAN W602 kernel modifications and rebuilding the Linux kernel and modules.
- Installing CC33XX firmware, drivers, and optional test utilities.
- Deploying the customized software stack to the target SD card.
- Verifying successful system bring-up and regulatory database integration.
- Performing initial Wi‑Fi functionality testing and validation.
Prepare SD card🔗
The following steps describe how to download and flash image to a microSD card.
-
On a Linux-based host PC, download the AM62x WIC image from Texas Instruments: tisdk-default-image-am62xx-evm-11.02.08.02.rootfs.wic.xz
-
Insert the SD Card to Linux-based host PC and check available block devices:
$ lsblk -p NAME MAJ:MIN RM SIZE RO TYPE MOUNTPOINTS /dev/sdd 8:48 1 29.8G 0 disk ├─/dev/sdd1 8:49 1 128M 0 part └─/dev/sdd2 8:50 1 1.9G 0 part -
Ensure that no entries are shown in the MOUNTPOINTS column for the SD card partitions. If any partition has been mounted automatically, unmount it before proceeding.
-
Remove existing filesystem signatures and partition metadata to ensure the SD card is in a clean, uninitialized state. So disk appears completely blank and uninitialized to all tools.
$ sudo wipefs -a /dev/sdd $ sudo dd if=/dev/zero of=/dev/sdd bs=1M count=10 -
Flash the microSD card with the prebuilt AM62x WIC image from Texas Instruments, with a tool like bmaptool:
$ sudo bmaptool copy --nobmap tisdk-default-image-am62xx-evm-11.02.08.02.rootfs.wic.xz /dev/sdd -
Mount the SD card boot partition to Linux-based host PC:
$ sudo mkdir -p /media/panw602_boot $ sudo mount /dev/sdd1 /media/panw602_boot/ -
On the boot partition of the SD card, add the following variable, corresponding to the starter kit, into the
uEnv.txtfile. This will let u-boot enable the m.2-cc33x1 devicetree overlay. TheuEnv.txtfile can be found on the boot partition of the SD card.
For SK-AM62B-P1:name_overlays=ti/k3-am625-sk-m2-cc3351.dtbo -
Unmount the SD card boot partition from the Linux-based host PC:
$ sudo umount /media/panw602_boot/
Software Development Kit🔗
The following steps describe how to download and install the Software Development Kit.
-
On a Linux-based host PC, download the AM62 Processor SDK: ti-processor-sdk-linux-am62xx-evm-11.02.08.02-Linux-x86-Install.bin
-
Start installation of the AM62 Processor SDK:
$ chmod +x ti-processor-sdk-linux-am62xx-evm-11.02.08.02-Linux-x86-Install.bin $ ./ti-processor-sdk-linux-am62xx-evm-11.02.08.02-Linux-x86-Install.bin -
Place the SDK for example in the home directory under
ti-subfolder:~/ti/ti-processor-sdk-linux-am62xx-evm-11.02.08.02
CC33XX Software Package🔗
The following steps describe how to download and install the CC33XX Software Package.
-
On a Linux-based host PC, download the CC33XX Software Package: cc33xx_linux_package_1_0_2_14.run
-
Start installation of the CC33XX Software Package:
$ chmod +x cc33xx_linux_package_1_0_2_14.run $ ./cc33xx_linux_package_1_0_2_14.run -
Place the SDK for example in the home directory under
ti-subfolder:~/ti
PAN W602 Regulatory Database & Configuration Package🔗
The following steps describe how to get regulatory and configuration files.
-
Visit Panasonic PAN W602 product website.
-
Fill out contact form
Request support or certification documents. -
Select
Regulatory Files, Certification & Test Reportsin Inquiry section. -
The technical support team will review your request and provide you with the necessary information and files.
-
Receive the
panw602-regulatory-package-yyyymmdd-vx.x.x.zipregulatory and configuration package. -
Unpack the
panw602-regulatory-package-yyyymmdd-vx.x.x.zippackage to a convenient location like~/ti/.unzip ~/ti/panw602-regulatory-package-yyyymmdd-vx.x.x.zip -d ~/ti
Prepare and Build Kernel🔗
The following steps describe how to prepare the sources and the build kernel.
-
Navigate to the TI Linux kernel source directory.
$ cd ~/ti/ti-processor-sdk-linux-am62xx-evm-11.02.08.02/board-support/ti-linux-kernel-6.12.57.../ -
Copy hexdump version of X.509 certificate
panasonic.hexfrompanw602_regulatorypackage tonet/wireless/certsfolder$ cp ~/ti/panw602_regulatory/panasonic.hex net/wireless/certs -
Set correct permissions for X.509 certificate
panasonic.hex,$ sudo chown <username>:<username> net/wireless/certs/panasonic.hex && chmod 644 net/wireless/certs/panasonic.hex -
Download the
panw602_cc33xx_ti_arm64_sdk.patchfrom the Downloads section and place on location e.g.:~/ti/ -
Review the patch file
panw602_cc33xx_ti_arm64_sdk.patch, verify kernel configuration options are enabled as loadable modules (m) and adjust if necessary.For Bluetooth operation over the UART interface, ensure that the following options are configured:
CONFIG_BT_TI=m,CONFIG_BT_TI_UART=mandCONFIG_BT_TI_SDIO=n.For Wi-Fi operation using the SDIO interface, ensure that the following options are configured:
CONFIG_CC33XX=m,CONFIG_CC33XX_SDIO=mandCONFIG_CC33XX_SPI=n.Just existing configurations starting with
CONFIG_CC33XXorCONFIG_BT_TIare allowed to be manipulated. -
Now apply the provided patch:
$ patch -p0 < ~/ti/panw602_cc33xx_ti_arm64_sdk.patch -
Add the SDK’s toolchain to the PATH environment variable and clean the kernel sources:
$ export PATH=<AM62 Processor sdk path>/linux-devkit/sysroots/x86_64-arago-linux/usr/bin/aarch64-oe-linux:$PATH $ make ARCH=arm64 CROSS_COMPILE=aarch64-oe-linux- distclean -
Build the kernel, modules, and devicetree:
$ make ARCH=arm64 CROSS_COMPILE=aarch64-oe-linux- defconfig ti_arm64_prune.config
$ make ARCH=arm64 CROSS_COMPILE=aarch64-oe-linux- Image modules dtbs -j8
Prepare Testing Tools (Optional)🔗
Note
This chapter is relevant only for scenarios where testing with the Calibrator Tool and/or the CC33Conf Tool is necessary.
Warning
The Calibrator Tool and the CC33Conf Tool included in the downloaded SDK are outdated and must be replaced with the latest available versions from CC33XX Software Package.
For additional Information about testing tools see chapters Calibrator Tool and CC33Conf Tool Guide of the Linux CC33XX User Guide which is located in /home/ubuntu/ti/cc33xx/docs/CC33XX-linux-User-Guide.html of the CC33XX Software Package downloaded above.
There are already versions of the mentioned tools available inside the CC33XX Software Package:
- Calibrator Tool:
~/ti/cc33xx/cc33xx_rootfs/usr/bin/calibrator - CC33Conf Tool:
~/ti/cc33xx/cc33xx_rootfs/usr/sbin/cc33conf/cc33xxconf
Warning
Depending on the host platform, the tools may need to be rebuilt for the target architecture. Inside the CC33XX Software Package there are build scripts and make files prepared to achieve this. See folders calibrator_src and cc33conf_src for detailed information.
For the SK-AM62B-P1 host platform used in this guide, check aspects like CPU width, ABI, Loader and Userspace. To check this use uname -a on your board.
root@am62xx-evm:~# uname -a
Linux am62xx-evm 6.12.57-xxx #1 SMP PREEMPT Fri Apr 10 11:31:34 UTC 2026 aarch64 GNU/Linux
and compare with Calibrator Tool delivered in CC33XX Software Package:
ubuntu@ubuntu:~/ti/cc33xx_linux_package_1_0_2_14/cc33xx/cc33xx_rootfs/usr/bin$ file calibrator
calibrator: ELF 32-bit LSB executable, ARM, EABI5 version 1 (SYSV), dynamically linked, interpreter /lib/ld-linux-armhf.so.3, for GNU/Linux 3.2.0, with debug_info, not stripped
The delivered Calibrator Tool is a 32‑bit ARM binary, while the target system runs a 64‑bit (AArch64) Linux kernel. As a result, the tool must be rebuilt for the target platform as described in the Linux CC33XX User Guide. Perform the same architecture compatibility check for the CC33Conf Tool and rebuild it if required.
Adjust flashed SD Card🔗
The following steps describe how to adjust the necessary content on the SD Card.
-
Mount the SD card:
$ sudo mount /dev/sdd2 /media/panw602/ -
Copy Panasonic's regulatory files to
/lib/firmware:$ sudo cp ~/ti/panw602-regulatory-package-yyyymmdd-vx.x.x/regulatory-database/regulatory.db /media/panw602/lib/firmware/ $ sudo cp ~/ti/panw602-regulatory-package-yyyymmdd-vx.x.x/regulatory-database/regulatory.db.p7s /media/panw602/lib/firmware/ $ sync -
Install the kernel, modules, and DTBs:
$ sudo cp arch/arm64/boot/Image /media/panw602/boot/ $ sudo make ARCH=arm64 modules_install INSTALL_MOD_PATH=/media/panw602 -
Install the CC33XX firmware and example scripts by copying the contents from cc33xx_rootfs into the SD card’s root directory. Note that the cc33xx_rootfs folder is part of the CC33XX Software Package, which was downloaded before.
$ cd <path_to_cc33xx_folder>/cc33xx_rootfs $ sudo cp -r lib/firmware/ti-connectivity/* /media/panw602/lib/firmware/ti-connectivity/ $ sudo cp -r usr/share/cc33xx/* /media/panw602/usr/share/cc33xx/ $ sync -
Copy Panasonic's configuration file to
/lib/firmware/ti-connectivityto replace defaultcc33xx-conf.bincopied from CC33XX Software package before. Take care that correctcc33xx-conf.binfor correct region is selected. For exampleETSI-DE.$ sudo cp ~/ti/panw602-regulatory-package-yyyymmdd-vx.x.x/configuration/<reg-domain>-<country-code>/cc33xx-conf.bin /media/panw602/lib/firmware/ti-connectivity/ $ sync -
Optional: Add
calibratorandcc33xxconftools to the SD card. Use original tools fromcc33xx_rootfsor the rebuilt ones, matching the host platform. See chapter Prepare Testing Tools (Optional) above.$ sudo cp -r <path_to_calibrator_tool> /media/panw602/usr/bin/ $ sudo cp -r <path_to_cc33xxconf_tool> /media/panw602/usr/sbin/cc33conf/ $ sync -
Unmount SD Card.
$ sudo umount /media/panw602/
System Bring‑Up Verification🔗
The following steps describe how to verify previous steps were successful.
-
Eject the SD card from the host PC and plug it into the SK-AM62B-P1. Apply the USB-C power supply and open a serial terminal with baudrate 115200. Successful system bring‑up is indicated by the availability of the CC33XX driver and the presence of the wlan0 network interface. Verify that the wlan0 interface is present by executing:
$ ip addr show wlan0 3: wlan0: <NO-CARRIER,BROADCAST,MULTICAST,UP> mtu 1500 qdisc mq qlen 1000 link/ether 34:32:e6:aa:bb:cc brd ff:ff:ff:ff:ff:ff -
Verify that the correct X.509 certificates are loaded into the kernel keyring.
$ dmesg | grep -i -e x.509 -e cert -e keyring [ 0.776084] Initialise system trusted keyrings [ 1.100258] Loading compiled-in X.509 certificates [ 1.107822] Loaded X.509 cert 'panasonic-ti: 4853952953d4553cbdc8059c7c910b0e58c16f7a' -
Check the currently configured country code.
$ iw reg get global country 00: DFS-UNSET (755 - 928 @ 2), (N/A, 20), (N/A), PASSIVE-SCAN ... -
Set your country code e.g.
DEand check again.$ iw reg set DE ... $ iw reg get global country DE: DFS-ETSI (2400 - 2483 @ 40), (N/A, 20), (N/A) ...
Wi-Fi Operation🔗
Prior to testing Wi-Fi functionality, execute ip addr show wlan0 command on the console to list available interfaces. If wlan0 interface is listed, it will confirm CC33XX drivers were loaded successfully.
-
Ensure that the interface is in the UP state.
$ ip link set dev wlan0 up -
Scan for devices.
$ iw dev wlan0 scan -
Print Capabilities.
$ iw list -
For additional testing see chapters like
STA Mode,AP Modeand others in sectionWiFi Fundamentalsof theLinux CC33XX User Guidewhich is located in/home/ubuntu/ti/cc33xx/docs/CC33XX-linux-User-Guide.htmlof theCC33XX Software Packagedownloaded above.