i.MX RT1170 EVK🔗
Introduction🔗
The PAN9028 requires a fairly powerful microcontroller that executes the low-level Wi-Fi® and Bluetooth® drivers as well as a network stack and a Bluetooth stack.
As an evaluation platform you can use the NXP i.MX RT1170 Evaluation Kit (MIMXRT1170-EVK), which is based on the i.MX RT1170 Crossover MCU with an Arm® Cortex®-M7 core and a Cortex-M4 core. It features 512 Mbit SDRAM, a 2 GB NAND Flash, Gigabit Ethernet and two Micro-USB OTG ports.
The i.MX RT1170 supports the SDIO 3.0 specification, which is required for operation of the PAN9028.
Getting Started
For an introduction to the i.MX RT1170 Evaluation Kit refer to the Getting Started with the i.MX RT1170 Evaluation Kit online guide.
The Wi-Fi driver and firmware for the PAN9028 are provided as part of the MCUXpresso SDK available for the i.MX RT Crossover MCUs.
Board Overview🔗

1
Arduino pin header
You can use the Arduino pin header to attach the UART host control interface for Bluetooth operation. Also see Connecting the UART Interface
2
Micro SD card slot
You can insert the PAN9028 mSD-U adapter into the micro SD card slot.
3
5 V DC power input jack
You can use the 5 V DC power input jack to supply power to the board.
4
Power switch
You can use the power switch to control the board power supply.
5
USB debug port
You can use the USB debug port to program the system and interact with it.
6
Debug LED - D5
You can observe the debug LED to verify activity on the debug port.
MCUXpresso for VS Code extension🔗
The MCUXpresso for VS Code extension provides an integrated development environment for the NXP i.MX RT1170 microcontroller based on the popular Visual Studio Code editor.
You can find further information and installation instructions on the MCUXpresso for VS Code extension homepage.
MCUXpresso SDK🔗
The MCUXpresso SDK includes drivers, middleware and reference examples for the NXP i.MX RT1170 microcontroller to enable easy application development.
Import the MCUXpresso SDK🔗
The following requirement must be met:
- You have installed the MCUXpresso for VS Code extension in Visual Studio Code.
To import the MCUXpresso SDK execute the following instructions.
-
Open the MCUXpresso for VS Code extension in Visual Studio Code.
-
Click Import Repository 1 in the QUICKSTART PANEL.

The Import Repository dialog opens.
-
In the newly opened window, you have to choose the REMOTE 1 tab.

-
Create a new folder for the MCUXpresso SDK at your preferred location 2.
-
Select the MCUXpresso SDK 3 repository.
-
Select the Revision MCUX_2.13.1 4.
Newer SDK Revisions
In newer versions of the MCUXpresso SDK certain Bluetooth example applications may be missing.
If you choose to use such a version of the MCUXpresso SDK, you may not be able to carry out the Bluetooth examples as shown here.
-
Click Import 5 .
An info dialog window appears and shows the progress cloning the MCUXpresso SDK.

-
You have to wait for the import to finish.
The MCUXpresso SDK Repository is added to the INSTALLED REPOSITORIES section of the MCUXpresso for VS Code extension.

Import an Example Application🔗
The MCUXpresso SDK comes with a set of example applications that you can use to evaluate the functionality and features of the Wi-Fi and Bluetooth drivers.
The following requirements must be met:
- You have installed the MCUXpresso for VS Code extension in Visual Studio Code.
- You have imported the MCUXpresso SDK in the MCUXpresso for VS Code extension as described in Import the MCUXpresso SDK.
To import any example application from the MCUXpresso SDK you have to execute the following steps.
-
Open the MCUXpresso for VS Code extension inside Visual Studio Code.
-
Click Import an Example from Repository 1 .

The Import an Example from Repository dialog opens.
-
Pick the folder with the imported MCUXpresso SDK Repository 1.

-
Choose an available toolchain 2.
-
Choose the MIMXRT1170-EVK board 3.
-
Choose your desired example 4.
-
Choose a name for your application 5.
-
Choose a location for your application 6.
-
Click the Create 7 button.
The application is imported and appears in the PROJECTS section of the MCUXpresso for VS Code extension.

Wi-Fi Operation🔗
Adding the Adapter Definition🔗
If you want to compile the Wi-Fi example applications for the PAN9028 mSD-U adapter you have to add some board definitions to the source code.
This section explains these changes using the example of the Wi-Fi CLI demo application (wifi_cli_cm7) which is described in more detail in CLI Demo Application.
The following requirements must be met:
- You have installed the MCUXpresso for VS Code extension in Visual Studio Code.
- You have imported the MCUXpresso SDK in the MCUXpresso for VS Code extension as described in Import the MCUXpresso SDK.
- You have imported the
wifi_cli_cm7example project from the MCUXpresso SDK in the MCUXpresso for VS Code extension as described in Import an Example Application.
Note
You have to use different adapter definitions depending on where you are going to run this setup.
Energy Detection Feature
If you intend to use the PAN9028 module in the EU, you have to assure that the energy detection feature is enabled and you have to provide the correct configuration settings.
To add the adapter definition for the PAN9028 module that include these configuration settings, execute the following steps.
-
In
../projects/mimxrt1170evk_wifi_cli_cm7/app_config.hadd the following definitions under the/* Wi-Fi boards configuration list */section. Make sure to place it inside the preprocessor#ifblock.... /* Panasonic PAN9028 mSD-U Adapter */ #elif defined(WIFI_88W8987_BOARD_PAN9028_SDIO) #define WIFI_BT_TX_PWR_LIMITS "wlan_txpwrlimit_cfg_WW.h" #define SD8987 #define SDMMCHOST_OPERATION_VOLTAGE_3V3 #define SD_TIMING_MAX kSD_TimingSDR50Mode #define WIFI_BT_USE_USD_INTERFACE #define WLAN_ED_MAC_CTRL \ { \ .ed_ctrl_2g = 0x1, .ed_offset_2g = 0x6, .ed_ctrl_5g = 0x1, .ed_offset_5g = 0x6 \ } ... -
Change the selected board to
WIFI_88W8987_BOARD_PAN9028_SDIO./* @TEST_ANCHOR */ #define WIFI_88W8987_BOARD_PAN9028_SDIO /* @END_TEST_ANCHOR */You can now compile the project. See CLI Demo Application.
To add the adapter definition for the PAN9028 module execute the following steps.
-
In
../projects/mimxrt1170evk_wifi_cli_cm7/app_config.hadd the following definitions under the/* Wi-Fi boards configuration list */section. Make sure to place it inside the preprocessor#ifblock.... /* Panasonic PAN9028 mSD-U Adapter */ #elif defined(WIFI_88W8987_BOARD_PAN9028_SDIO) #define WIFI_BT_TX_PWR_LIMITS "wlan_txpwrlimit_cfg_WW.h" #define SD8987 #define SDMMCHOST_OPERATION_VOLTAGE_3V3 #define SD_TIMING_MAX kSD_TimingSDR50Mode #define WIFI_BT_USE_USD_INTERFACE #define WLAN_ED_MAC_CTRL \ { \ .ed_ctrl_2g = 0x0, .ed_offset_2g = 0x6, .ed_ctrl_5g = 0x0, .ed_offset_5g = 0x6 \ } ... -
Change the selected board to
WIFI_88W8987_BOARD_PAN9028_SDIO./* @TEST_ANCHOR */ #define WIFI_88W8987_BOARD_PAN9028_SDIO /* @END_TEST_ANCHOR */You can now compile the project. See CLI Demo Application.
Note
Please contact your local Panasonic Sales representative for details on additional product options and services.
If you intend to use the PAN9028 module in multiple regions, you have to use the same configuration as in the case for the EU.
This is mainly because the EU has some of the strictest regulatory standards, and if you use the appropriate configuration this ensures compliance with these requirements.
CLI Demo Application🔗
The Wi-Fi CLI demo application showcases the configuration and basic operation of the station and access point interfaces via a simple command line interface.
The following requirements must be met:
- You have installed the MCUXpresso for VS Code extension in Visual Studio Code.
- You have imported the MCUXpresso SDK in the MCUXpresso for VS Code extension as described in Import the MCUXpresso SDK.
- You have imported the
wifi_cli_cm7example project from the MCUXpresso SDK in the MCUXpresso for VS Code extension as described in Import an Example Application. - You have added the adapter definition for the PAN9028 mSD-U adapter to the
wifi_cli_cm7sources as described in Adding the Adapter Definition.
To compile the Wi-Fi CLI demo application and program the system execute the following steps.
-
Insert the PAN9028 mSD-U adapter into the micro SD card slot 2.
-
Connect the USB debug port 5 to your computer.
-
Insert the power supply cable in the 5 V DC power input jack 3 and power up the i.MX RT1170 Evaluation Kit using the power switch 4.
-
Click the Build selected button 1 inside the PROJECTS section of the MCUXpresso for VS Code extension to build the project.

The Visual Studio Code terminal output window shows the build progress.
-
Check if the debug probe DAPLink CMSIS-DAP was detected correctly by clicking the refresh debug probes icon 1 in the DEBUG PROBES section of the MCUXpresso for VS Code extension.

-
Right click the mimxrt1170evk_wifi_cli_cm7 application and select Flash the Selected Target 1 in the PROJECTS section of the MCUXpresso for VS Code extension.

As long as the programming is in progress the Debug LED D5 6 is blinking.
-
Switch to the SERIAL MONITOR tab in the Visual Studio Code terminal window to observe the UART debug output of the application 1.

-
Select the parameters like in the image above: MonitorMode: Serial, ViewMode: Text, Port: <Depends on your port>, Baud rate: 115200, Line ending: None 2.
-
Take care that Terminal Mode is switched on 3.
-
Click Start Monitoring 4 .
You can observe the debug output of the application in the serial monitor window. You can control the application now using the command line interface.
-
Enter
helpto list all available commands. For more detailed information on an individual command, enter the command without any parameters.
Station🔗
You can connect the PAN9028 to an access point. In this case the module acts as a so-called Wi-Fi station.
To connect the station interface to a Wi-Fi network execute the following steps.
-
Enter the following command to scan for available Wi-Fi networks that are in range.
wlan-scan -
Add a new profile for the network that you want to connect to by entering the following command. You can freely choose the
profile_name.wlan-add <profile_name> ssid <ssid> wpa2 <password> -
Enter the following command and specify the previously added profile to establish the connection.
wlan-connect <profile_name>The system attempts to connect to the specified Wi-Fi network.
Access Point🔗
To configure and start up a Wi-Fi access point execute the following steps.
-
Add a profile with the desired parameters for your access point by entering the following command. You can freely choose the
profile_name.wlan-add <profile_name> ssid <ssid> ip:<ip_address>,<gateway>,<netmask> \ role uap channel <channel_number> wpa2 <password> -
Enter the following command with the previously added profile to bring up the access point.
wlan-start-network <profile_name>The access point starts up. Devices that connect to it are assigned an IP address using DHCP.
Note
For further information please refer to the user manual UM11442 - NXP Wi-Fi and Bluetooth Demo Applications User Guide for i.MX RT Platforms.
This document is included in the wireless directory of the legacy MCUXpresso SDK ZIP file. Refer to Download Legacy MCUXpresso SDK for instructions how to get access to this file.
Bluetooth Operation🔗
Adjusting the Adapter Configuration🔗
If you want to compile the Bluetooth example applications for the PAN9028 mSD-U adapter you have to modify some board definitions and make an adjustment to the UART configuration.
This section explains these changes using the example of the Bluetooth shell demo application (edgefast_bluetooth_shell) which is described in more detail in Shell Demo Application.
The following requirements must be met:
- You have installed the MCUXpresso for VS Code extension in Visual Studio Code.
- You have imported the MCUXpresso SDK in the MCUXpresso for VS Code extension as described in Import the MCUXpresso SDK.
- You have imported the
edgefast_bluetooth_shellexample project from the MCUXpresso SDK in the MCUXpresso for VS Code extension like described forwifi_cli_cm7in Import an Example Application.
Note
You have to use different adapter definitions depending on where you are going to run this setup.
To add the PAN9028 mSD-U adapter to the example project execute the following steps.
-
In
../projects/mimxrt1170evk_edgefast_bluetooth_shell/bt_module_config.hchange the existingWIFI_88W8987_BOARD_MURATA_1ZM_USDdefinition block in the/* Wi-Fi boards configuration list */section to contain the following.... #elif (defined(WIFI_88W8987_BOARD_MURATA_1ZM_USD)) /* Panasonic PAN9028 mSD-U Adapter */ #define WIFI_BT_TX_PWR_LIMITS "wlan_txpwrlimit_cfg_WW.h" #define SD8987 #define SDMMCHOST_OPERATION_VOLTAGE_3V3 #define SD_TIMING_MAX kSD_TimingSDR50Mode #define WIFI_BT_USE_USD_INTERFACE #define WLAN_ED_MAC_CTRL \ { \ .ed_ctrl_2g = 0x1, .ed_offset_2g = 0x6, .ed_ctrl_5g = 0x1, .ed_offset_5g = 0x6 \ } ... -
In
../projects/mimxrt1170evk_edgefast_bluetooth_shell/app_config.hchange the selected board toWIFI_88W8987_BOARD_MURATA_1ZM_USD./* @TEST_ANCHOR */ #define WIFI_88W8987_BOARD_MURATA_1ZM_USD /* @END_TEST_ANCHOR */ -
Locate the
controller_hci_uart_get_configurationfunction in../projects/mimxrt1170evk_edgefast_bluetooth_shell/main.cthat is included by the preprocessor. Setconfig->defaultBaudrateto 3 Mbaud instead of 115200 baud. It should look as follows.... #elif defined(WIFI_88W8987_BOARD_MURATA_1ZM_USD) || defined(WIFI_IW416_BOARD_MURATA_1XK_USD) int controller_hci_uart_get_configuration(controller_hci_uart_config_t *config) { ... config->defaultBaudrate = 3000000u; ... } ...You can now compile the project. See Shell Demo Application.
To add the PAN9028 mSD-U adapter to the example project execute the following steps.
-
In
../projects/mimxrt1170evk_edgefast_bluetooth_shell/bt_module_config.hchange the existingWIFI_88W8987_BOARD_MURATA_1ZM_USDdefinition block in the/* Wi-Fi boards configuration list */section to contain the following.... #elif (defined(WIFI_88W8987_BOARD_MURATA_1ZM_USD)) /* Panasonic PAN9028 mSD-U Adapter */ #define WIFI_BT_TX_PWR_LIMITS "wlan_txpwrlimit_cfg_WW.h" #define SD8987 #define SDMMCHOST_OPERATION_VOLTAGE_3V3 #define SD_TIMING_MAX kSD_TimingSDR50Mode #define WIFI_BT_USE_USD_INTERFACE #define WLAN_ED_MAC_CTRL \ { \ .ed_ctrl_2g = 0x0, .ed_offset_2g = 0x6, .ed_ctrl_5g = 0x0, .ed_offset_5g = 0x6 \ } ... -
In
../projects/mimxrt1170evk_edgefast_bluetooth_shell/app_config.hchange the selected board toWIFI_88W8987_BOARD_MURATA_1ZM_USD./* @TEST_ANCHOR */ #define WIFI_88W8987_BOARD_MURATA_1ZM_USD /* @END_TEST_ANCHOR */ -
Locate the
controller_hci_uart_get_configurationfunction in../projects/mimxrt1170evk_edgefast_bluetooth_shell/main.cthat is included by the preprocessor. Setconfig->defaultBaudrateto 3 Mbaud instead of 115200 baud. It should look as follows.... #elif defined(WIFI_88W8987_BOARD_MURATA_1ZM_USD) || defined(WIFI_IW416_BOARD_MURATA_1XK_USD) int controller_hci_uart_get_configuration(controller_hci_uart_config_t *config) { ... config->defaultBaudrate = 3000000u; ... } ...You can now compile the project. See Shell Demo Application.
Note
Please contact your local Panasonic Sales representative for details on additional product options and services.
If you intend to use the PAN9028 module in multiple regions, you have to use the same configuration as in the case for the EU.
This is mainly because the EU has some of the strictest regulatory standards, and if you use the appropriate configuration this ensures compliance with these requirements.
Connecting the UART Interface🔗
The following requirement must be met:
- You have configured the Bluetooth host interface to be UART as described in Bluetooth Interface Configuration.
To run the Bluetooth demo applications from the MCUXpresso SDK you have to connect the UART host interface to the Arduino pin header 1 of the i.MX RT1170 Evaluation Kit using jumper cables.
Refer to the following diagram for the connections that you need to establish.
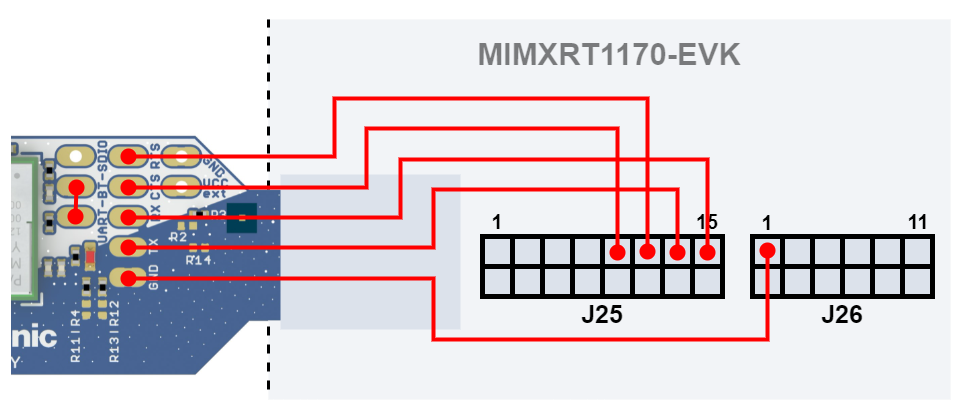
You need to connect the following pins.
| PAN9028 mSD-U adapter UART Pin Header |
MIMXRT1170-EVK Arduino pin header 1 |
|---|---|
| TX | J25 pin 13 |
| RX | J25 pin 15 |
| CTS | J25 pin 9 |
| RTS | J25 pin 11 |
| GND | J26 pin 1 |
Shell Demo Application🔗
The Bluetooth shell demo application showcases the operation of Bluetooth Low Energy and BR/EDR functionality via a simple command line interface.
The following requirements must be met:
- You have installed the MCUXpresso for VS Code extension in Visual Studio Code.
- You have imported the MCUXpresso SDK in the MCUXpresso for VS Code extension as described in Import the MCUXpresso SDK.
- You have imported the
edgefast_bluetooth_shellexample project from the MCUXpresso SDK in the MCUXpresso for VS Code extension like described forwifi_cli_cm7in Import an Example Application. - You have applied the necessary changes for the PAN9028 mSD-U adapter to the
edgefast_bluetooth_shellsources as described in Adjusting the Adapter Configuration. - You have connected the UART interface to the i.MX RT1170 Evaluation Kit as described in Connecting the UART Interface.
To compile the Bluetooth shell demo application and program the system execute the following steps.
-
Insert the PAN9028 mSD-U adapter into the micro SD card slot 2.
-
Make sure the UART host interface is connected correctly to the Arduino pin header 1 of the i.MX RT1170 Evaluation Kit.
-
Connect the USB debug port 5 to your computer.
-
Insert the power supply cable into the 5 V DC power input jack 3 and power up the i.MX RT1170 Evaluation Kit using the power switch 4.
-
Click the Build selected button 1 inside the PROJECTS section of the MCUXpresso for VS Code extension to build the project.

The Visual Studio Code terminal output window shows the build progress.
-
Check if the debug probe DAPLink CMSIS-DAP was detected correctly by clicking the refresh debug probes icon 1 in the DEBUG PROBES section of the MCUXpresso for VS Code extension.
-
Right click the mimxrt1170evk_edgefast_bluetooth_shell application and select Flash the Selected Target 1 in the PROJECTS section of the MCUXpresso for VS Code extension.

As long as the programming is in progress the Debug LED D5 6 is blinking.
-
Switch to the SERIAL MONITOR tab in the Visual Studio Code terminal window to observe the UART debug output of the application 1.

-
Select the parameters like in the image above: MonitorMode:Serial, ViewMode:Text, Port:<Depends on your port>, Baud rate: 115200, Line ending: None 2.
-
Take care that Terminal Mode is switched on 3.
-
Click Start Monitoring 4 .
You can observe the debug output of the application in the serial monitor window. You can control the application now using the command line interface.
-
Execute the following commands in the command line interface. The command line interface is prefixed with
@bt>. -
Download the firmware to the PAN9028 and initialize the UART host command interface.
bt.initThe system is ready for operation.
-
List all available commands.
help
Scan for Bluetooth Devices🔗
To scan for other Bluetooth devices in range execute the following steps.
-
Enter the following command to start the scan.
bt.scan onThe scan results are printed continuously until the scan is stopped.
-
Enter the following command to stop the scan.
bt.scan off
GATT Service Discovery🔗
To connect to a device and run a GATT service discovery execute the following steps.
-
Enter the following command to connect to a device.
In case the device uses a random device address use
randominstead ofpublic.bt.connect <device_address> public -
Enter the following command to run the GATT service discovery.
gatt.discoveryThe discovery result is printed.
-
Enter the following command to disconnect.
bt.disconnect
Note
For further information please refer to the user manual UM11442 - NXP Wi-Fi and Bluetooth Demo Applications User Guide for i.MX RT Platforms.
This document is included in the wireless directory of the legacy MCUXpresso SDK ZIP file. Refer to Download Legacy MCUXpresso SDK for instructions how to get access to this file.
Addendum🔗
Download Legacy MCUXpresso SDK🔗
In the past NXP used to distribute the MCUXpresso SDK as a ZIP file and not through the MCUXpresso for VS Code extension.
Not all content has been moved to the new environment yet, so some information is only present in the ZIP file of the MCUXpresso SDK release, for example various user guides related to Wi-Fi and Bluetooth.
If you need access to this content, you can download the legacy MCUXpresso SDK as a ZIP file using the following steps.
-
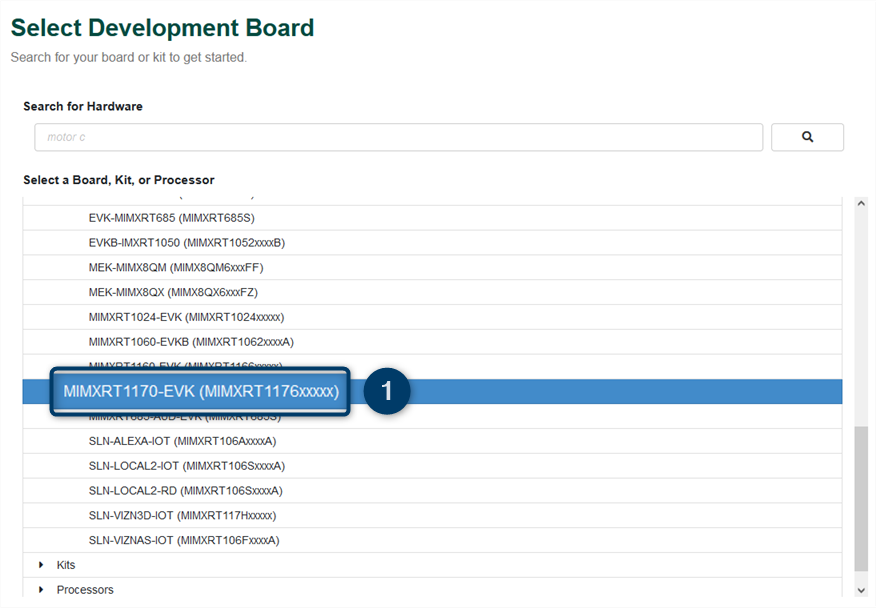
Go to the MCUXpresso SDK Builder website.
-
Click Select Development Board.
-
The website prompts you to login. Login using your account credentials for the NXP Homepage.
-
Under Select a Board, Kit, or Processor > Boards > i.MX select the MIMXRT1170-EVK (MIMXRT1176xxxxx)1.
-
Select the desired version 1 and click Build MCUXpresso SDK 2.
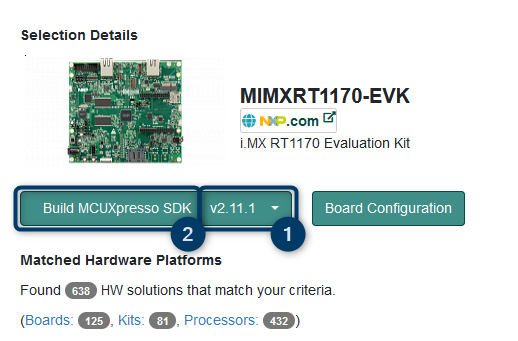
The MCUXpresso SDK Builder forwards you to the software selection table.
-
Select FreeRTOS 1, NXP Wi-Fi 2 and Wireless edgefast_bluetooth stack 3 checkboxes.
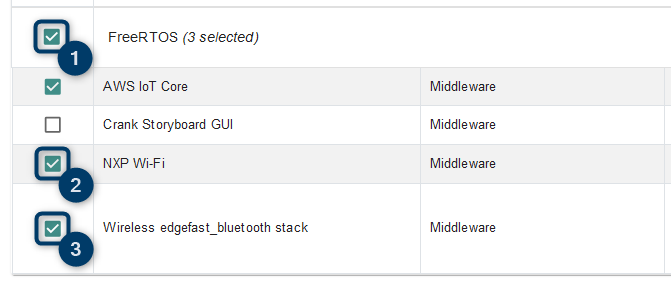
All necessary software dependencies get selected automatically.
-
Click on Download SDK.

The MCUXpresso SDK Builder generates the MCUXpresso SDK.
-
Once the MCUXpresso SDK Builder is done generating the MCUXpresso SDK click on Download SDK 1.

-
Click on Download SDK Archive including documentation 1. You are prompted to read and accept an EULA.
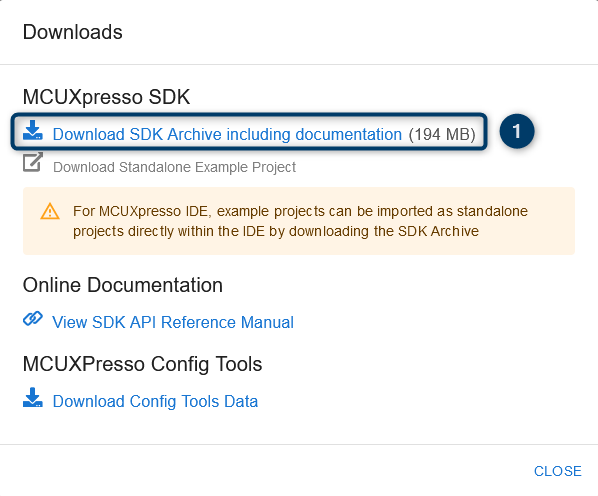
Once you have accepted the EULA, the MCUXpresso SDK is downloaded in the form of a zip-archive (
SDK_X_XX_X_MIMXRT1170-EVK.zip).
Wi-Fi- and Bluetooth-related User Manuals
You can find Wi-Fi- and Bluetooth-related user manuals in the wireless directory in the ZIP file.