Getting Started🔗
Introduction🔗
First, this guide shows you how to set up a development environment for the PAN1783 and then how to build and run a simple application on the PAN1783 evaluation board.
Overview🔗
The development environment from Nordic Semiconductor for the PAN1783 is based on the nRF Connect SDK and Visual Studio Code.
Installation🔗
You can find step-by-step instructions for installing the development environment at Getting started.
The instructions explain the following points:
-
Installation of all necessary prerequisites, including the installation of the nRF Connect for Visual Studio Code extension pack.
-
Installation of a recent version of the nRF Connect SDK toolchain and the nRF Connect SDK code.
Afterward you are ready to build and run your first application.
Step-by-Step🔗
The following requirement must be met:
- You must have setup the development environment as explained in Installation.
The following sections provide a step-by-step introduction on how to build and run your first application.
Project Setup🔗
You have to do the project setup from within the nRF Connect for Visual Studio Code extension.
-
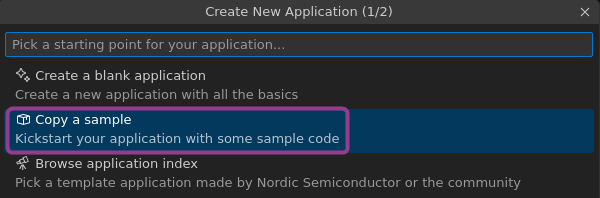
In the nRF Connect section click Create a new application .

-
In the newly opened edit box, choose Copy a sample first.
-
In the newly opened edit box, search for sample applications 1. Enter
peripheral_uarthere. From the list of applications choose Bluetooth LE UART service .
-
In the newly opened edit box, configure and confirm the path 1 where the new application is stored.

-
Finish the project setup by clicking Open

You can check out Bluetooth: Peripheral UART for more details about the Peripheral UART sample application.
Configuration🔗
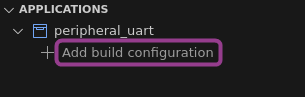
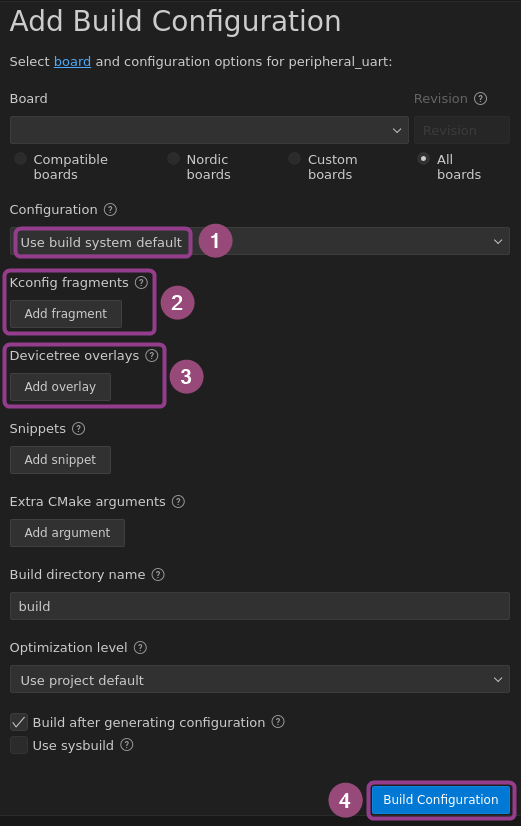
After you have set up the project you have to create a build configuration.
-
In the Applications section, click on Add build configuration .
-
In the newly opened window, choose All 1 first. Then start typing
pan2 in the board edit box.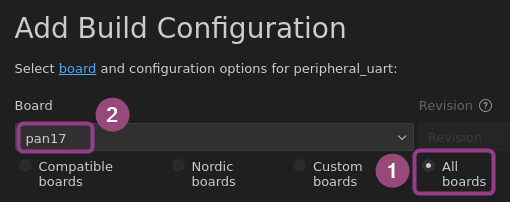
-
Continue typing or choose the evaluation board you want to use from the drop-down list.
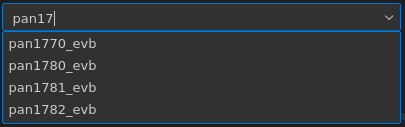
Note
For the PAN1783 evaluation board choose pan1783_evb/nrf5340/cpuapp.
-
Sometimes you can choose different project configurations using the Add Configuration File 1 button. Furthermore you can fine-tune the project by changing
- Extra Kconfig fragments
- Base Devicetree overlays
- Extra Devicetree overlay and
- Extra CMake arguments.
Check out the individual sample descriptions in the nRF Connect SDK for possible settings.
Finally click Build Configuration 2 to finish.
-
The application build is automatically started. You can observe the progress of the build in the terminal window.
-
If the terminal window is not visible, choose View → Terminal from the main Visual Studio Code window.
Customization🔗
Bluetooth Device Address🔗
All applications from the nRF Connect SDK automatically use the built-in random Bluetooth Device Address.
But if you want to use the built-in public Bluetooth Device Address from Panasonic instead, you can use the following approach on most applications.
-
Open the file
main.cand add the following function anywhere in the file.main.c#include <zephyr/bluetooth/hci_vs.h> static int set_bd_addr(void) { bt_addr_t addr; struct net_buf *buf; int ret; addr.val[0]= NRF_UICR->OTP[0]; addr.val[1]= NRF_UICR->OTP[0] >> 8; addr.val[2]= NRF_UICR->OTP[0] >> 16; addr.val[3]= NRF_UICR->OTP[0] >> 24; addr.val[4]= NRF_UICR->OTP[1]; addr.val[5]= NRF_UICR->OTP[1] >> 8; buf = bt_hci_cmd_create(BT_HCI_OP_VS_WRITE_BD_ADDR, sizeof(addr)); if (!buf) { LOG_ERR("failed to create buffer"); return -ENOMEM; } net_buf_add_mem(buf, &addr, sizeof(addr)); ret = bt_hci_cmd_send_sync(BT_HCI_OP_VS_WRITE_BD_ADDR, buf, NULL); if (ret) { LOG_ERR("failed to set Bluetooth address [%d]", ret); return ret; } return 0; } -
Locate the call to the function
bt_enable()in themain()function.main.cerr = bt_enable(NULL); if (err) { error(); } -
Insert the following code snippet right after the call to
bt_enable().main.cerr = set_bd_addr(); if (err) { error(); }The application now uses the built-in public Bluetooth Device Address from Panasonic.
Build🔗
After you created the build configuration the application is usually build automatically. In this case you can skip this step.
But if you ever need to build or rebuild the application you can follow the following steps.
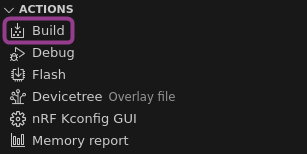
-
From the Actions section, build the application by clicking Build
Program🔗
After you have built the application you are ready to program the application to your PAN1783 evaluation board.
-
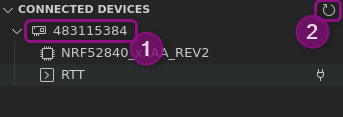
Connect your PAN1783 evaluation board to your development system using the USB connector X1 2.
-
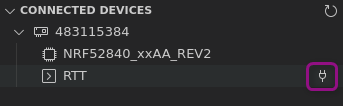
Check that your evaluation board is shown in the Connected Devices section 1. If it is not, click on the refresh icon 2.
-
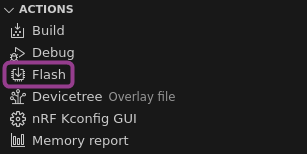
In the Actions section, click on Flash to start programming. You can observe the progress in the terminal window again.
Usage🔗
After you have programmed the application you can observe what the application is doing in multiple ways.
RTT Output🔗
-
In the Connected Devices section, click the plug icon to connect the RTT communication to the terminal window.
-
In the newly opened edit box, select the RTT output of the application core using nRF5340_xxAA_APP .

-
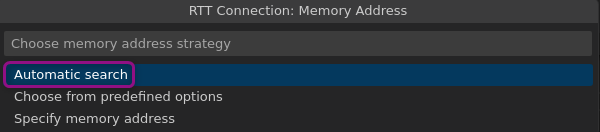
In the newly opened edit box, select Automatic search .
-
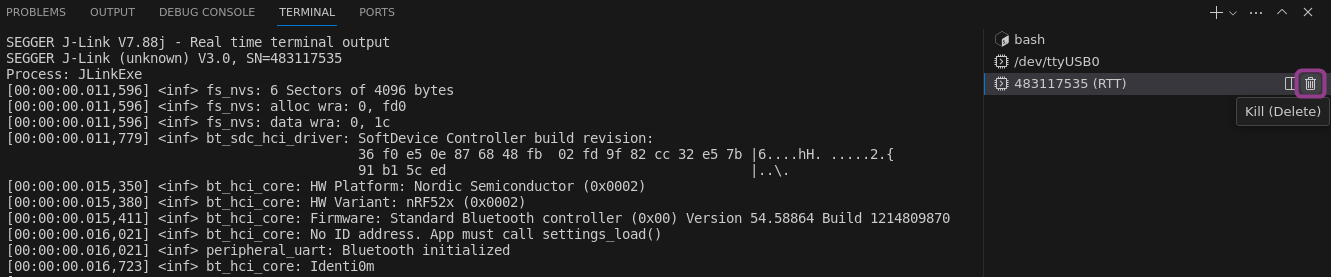
You should see the following output (or similar) in the terminal window.
SEGGER J-Link V7.88e - Real time terminal output J-Link OB-SAM3U128 V3 compiled Sep 22 2022 13:22:46 V3.0, SN=483150802 Process: JLinkExe [00:00:00.013,397] <inf> fs_nvs: 2 Sectors of 4096 bytes [00:00:00.013,427] <inf> fs_nvs: alloc wra: 0, fe8 [00:00:00.013,427] <inf> fs_nvs: data wra: 0, 0 [00:00:00.035,949] <inf> bt_hci_core: HW Platform: Nordic Semiconductor (0x0002) [00:00:00.036,041] <inf> bt_hci_core: HW Variant: nRF53x (0x0003) [00:00:00.036,041] <inf> bt_hci_core: Firmware: Standard Bluetooth controller (0x00) Version 224.11902 Build 2231721665 [00:00:00.037,231] <inf> bt_hci_core: No ID address. App must call settings_load() [00:00:00.037,261] <inf> peripheral_uart: Bluetooth initialized [00:00:00.038,696] <inf> bt_hci_core: Identity: DB:FB:11:25:55:78 (random) [00:00:00.038,757] <inf> bt_hci_core: HCI: version 5.4 (0x0d) revision 0x2077, manufacturer 0x0059 [00:00:00.038,787] <inf> bt_hci_core: LMP: version 5.4 (0x0d) subver 0x2077 -
You can click on the trash can icon right to the terminal window to close the RTT connection again.
Serial Output🔗
Serial Port Handling in Linux vs. Windows
The following instructions were assembled under Linux, so the serial port notation looks like /dev/ttyUSB0 or /dev/ttyACM0. If you are using Windows instead, the notation is different and looks like COM10.
Also you might see multiple serial ports and you might need to find out the serial port that you actually need to use.
The terminal is also capable of attaching to the serial output of the evaluation board.
-
In the Connected Devices section, click the plug icon to connect the serial communication to the terminal window.

-
In the newly opened edit box, select the appropriate device from the list of choices.

-
You may have to choose a configuration. If so, choose 115200 8n1 rtscts:off .
-
Now you have to press the reset Button RST 1 to restart the application. You should see the following output in the terminal window.
*** Booting My Application v2.8.0-3be93e0f87a1 ***
*** Using nRF Connect SDK v2.8.0-a2386bfc8401 ***
*** Using Zephyr OS v3.7.99-0bc3393fb112 ***
Starting Nordic UART service example
Debugging🔗
You can also debug your application instead of just programming and running it.
-
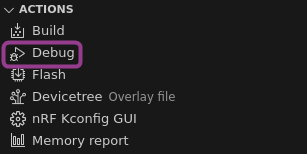
In the Actions section, click on Debug to start debugging.
You can check out How to debug an application for more detailed information on how you can control the debugging process.
Summary🔗
Through this guide you have learned how to set up a development environment for the PAN1783 based on the nRF Connect SDK and Visual Studio Code.
You have set up, configured and built the Bluetooth: Peripheral UART sample application and learned how to observe the messages and debug output on the serial port terminal and the RTT terminal.
For more information how to interact with the Bluetooth: Peripheral UART sample application you can also check out the nRF Toolbox application for your mobile device.
Further Readings🔗
Nordic Semiconductor provides extensive documentation and information for Bluetooth Low Energy.
For example, you can check out the Nordic Developer Academy which is an "[...] interactive online learning platform [...] to equip developers with the technical information and know-how to build wireless products using Nordic Semiconductor solutions."